Hey, check out my Modern Python Projects course. It's an extended version of this workshop!
Docker
There are plenty of ways to deploy your application. You can rent a server and manually copy all the files there, install pip packages, and start Python server. You can automate this process with some bash scripts or tools like Ansible, Chef, Puppet, or SaltStack.
But one of the most popular option nowadays is to use Docker. If you don’t know what Docker is - it’s a tool for containerizing your application. “Containerization” means that you create a package (called “image”) with:
- The code of your application
- All the dependencies (pip packages, but also packages installed with apt-get)
- Information on how to “run” this package
You can then send this “image” to a server (with Docker installed), and with just one command, have your application up and running.
Docker takes away a lot of hassle with deployment, but it’s not an easy tool to use. It’s yet another tool that you have to learn. Especially at the beginning, it can be very frustrating - your application doesn’t work, but you don’t know if there is a problem with your code or with the Docker configuration. But once you have it running, deploying your application will be much easier, so it’s worth investing some time.
Dockerize our app
Let’s modify our TODO application to use Docker. To do that, we need to create a Dockerfile. Here is the most basic example that that will work:
# Specify base image
FROM python
# Copy all the code inside the container
COPY . .
# Install dependencies
RUN pip install -r requirements.txt
# Start server
CMD ["python", "run.py"]
Save this file in the root folder of your project.
We will also need to make one change in the Flask application itself. By default, the app.run() command in the run.py file is binding the Flask server to localhost (127.0.0.1), and for Docker, we need to bind it to 0.0.0.0 (here is why).
In the run.py make the following modification:
# Remove this:
app.run()
# Add this:
app.run(host='0.0.0.0')
Next, build the Docker image with the following command:
$ docker build [-t todo-app] .
Sending build context to Docker daemon  56.83kB
Step 1/4 : FROM python
 ---> f88b2f81f83a
Step 2/4 : COPY . .
 ---> Using cache
 ---> 6563bd12bc46
Step 3/4 : RUN pip install -r requirements.txt
 ---> Using cache
 ---> f3761e52f71a
Step 4/4 : CMD ["python", "run.py"]
 ---> Using cache
 ---> 1a8d66578511
Successfully built todo-app:latest
The -t todo-app is optional, but it will make it much easier to find and use this image later. It assigns a tag to our image. If you specify a tag, Docker will, instead of assigning a random name (like 1a8d66578511), name our image todo-app.
Once the image is build, we can run it:
$ docker run -p 5000:5000 todo-app                                                                                                                                                                            * Serving Flask app "todo" (lazy loading)
 * Environment: production
   WARNING: This is a development server. Do not use it in a production deployment.
   Use a production WSGI server instead.
 * Debug mode: off
 * Running on http://0.0.0.0:5000/ (Press CTRL+C to quit)
Exposing ports
Docker tries hard to be as secure as possible out of the box. By default, it’s not exposing any ports of the container. So even though the application is running inside the container on port 5000, we still need to pass the parameter -p 5000:5000 to expose this port so we can access it from our computer by going to 0.0.0.0:5000.
You can also use -p 80:5000 to map port 5000 from the container to port 80 on your computer (so you can skip the port in the URL and use just 0.0.0.0).
Improving our Dockerfile
Now that we saw Docker in action let’s get back to our Dockerfile. Is this a good Dockerfile? Is it ready to send your code to production?
First of all, we are still using the SQLite database (which is not suitable for production), and the debugger is enabled (which is a terrible idea for production). Those two things can be fixed with a proper database like PostgreSQL, docker-compose, and env variables.
But even disregarding the shortcomings of our Flask application, the Dockerfile is far from perfect. Here are some drawbacks:
We are not specifying which version of Python we want to use. Without a tag, Docker will pull images tagged with
latest. At the time of writing this, thelatesttag is assigned to version 3.8.2. But later it’s going to be assigned to 3.8.3 and then 3.9 and so on. If a new version of Python introduces some breaking changes, you will only notice that after your application goes down. And we don’t want that. So always specify a tag for the base image.We copy everything from the current directory into the root of the container. This has multiple problems:
The main issue is not using the caching in docker properly. Docker caches each step of the build stage (each command in the Dockerfile is a build step). When you run the
docker buildcommand again, Docker will check if it needs to run a given step or if it can reuse the cache. For example, if you don’t change the base image, Docker will use the cached one instead of redownloading it. If you have a command toapt-get installsome packages and you don’t modify that list, docker will reuse the cached layer instead of reinstalling all the packages. Once Docker gets to a step where it can’t use the cache, it will rerun this and EVERY next command. Understanding how caching works and how to take advantage of it is one of the most important things to learn when using Docker. It will shorten your build times from minutes to seconds!
In our case, when we copy all the files and then runpip install. Now, each time we modify any file in our project, it will invalidate the cache, and then the next step - the pip install command - will be rerun. And installing packages usually takes some time.
We could instead copy only therequirements.txtfile first, run pip, and then copy the rest of the files. That way,pip installstep will be invalidated only when therequirements.txtfile changes. You want to put lines that can change as low in the Dockerfile as possible.We send some files to Docker that it doesn’t need at all. For example, the
venvdirectory (if we store it inside the project), .vscode settings, etc. Andvenvfolder is usually huge compared with the actual code of our project (dozens of MBs vs. dozens of KBs). This will increase your build time unnecessarily.You are copying files to the root of the container. Normally it doesn’t matter, but if you ever need to start a bash session in the container and move around your project there, it will be a mess to figure out which files belong to your project and which belong to the container. It’s much better to copy your project into a separate directory with a command like:
COPY . /project.
We don’t specify which version of pip we want to use. In this case, it’s probably not a big problem.
pythonimage will make sure that the pip version it uses is bug-free. But if you install packages withapt-get, it’s a good idea to pin packages versions. Doapt-get install git=2.23, notapt-get install git. 99% of the time, you should be fine without pinned versions of apt packages (since creators of Ubuntu/Debian Docker images will test them), but it might save you from 1% of weird bugs. It will also help you with cache busting.
Here is a better Dockerfile for our TODO application:
# Select base image from https://hub.docker.com/
FROM python:3.8.2-slim-buster

# Copy requirements first to leverage Docker caching
COPY ./requirements.txt /project/requirements.txt

# Set working directory for RUN, CMD, ENTRYPOINT, COPY, and ADD commands
WORKDIR /project

# Install pip packages
RUN pip install -r requirements.txt

# Copy all the code inside the container
COPY . /project

# Run "python run.py command"
CMD [ "python", "run.py" ]
In this version, we specify the image tag, we copy and install pip requirements, and then we copy the rest of the code.
Sending our image to a server
We ran our Docker image on our computers, but what if we want to run it on a server or a different computer? We can push the image to Docker Hub and download it on a different computer. That’s the easiest way of moving your docker images around.
To follow the next part and use Docker Hub, you need to first register (using Docker Hub is free - it’s like GitHub for your Docker images). Once you register, log in (either through the Docker Desktop application or by running $ docker login command in your terminal).
First, we need to tag the image:
# Replace "switowski" with your Docker Hub username
$ docker tag todo-app:latest switowski/todo-app:latest
Then push that image to Docker Hub:
$ docker push switowski/todo-app
To run your application on a different computer you just need to specify the name of the image from Docker Hub:
$ docker run -p 5000:5000 switowski/todo-app
To verify that we are actually using the image from Docker Hub, not the one built on our computer, remove the local versions of todo-app:
# Find all todo-app images
$ docker images | grep todo
todo-app
switowski/todo-app

# And delete them
$ docker image rm --force todo-app switowski/todo-app
And try to run it again:
$ docker run -p 5000:5000 switowski/todo-app
Unable to find image 'switowski/todo-app:latest' locally
latest: Pulling from switowski/todo-app
Play with Docker playground
If you want to deploy your Docker images outside of your computer, you can create an AWS or GCP account. But that costs money and takes time to set up. For our simple testing scenario, we can use the free Play with Docker playground. It lets you play with docker commands for free (you can even deploy multiple containers in Docker Swarm Mode). It’s not something that you can use for production, but it’s a perfect way to test our todo-app.

Once you log in (with Docker Hub credentials), click “Start”, and this will create a session for you that will last 4 hours. After 4 hours, everything inside the session is scraped, and you have to start another session.
We add a new instance and run our image. Once the server is running, at the top of the page, next to the IP, you should see that port 5000 was opened. If you click it, you will be taken to a website serving your TODO application.
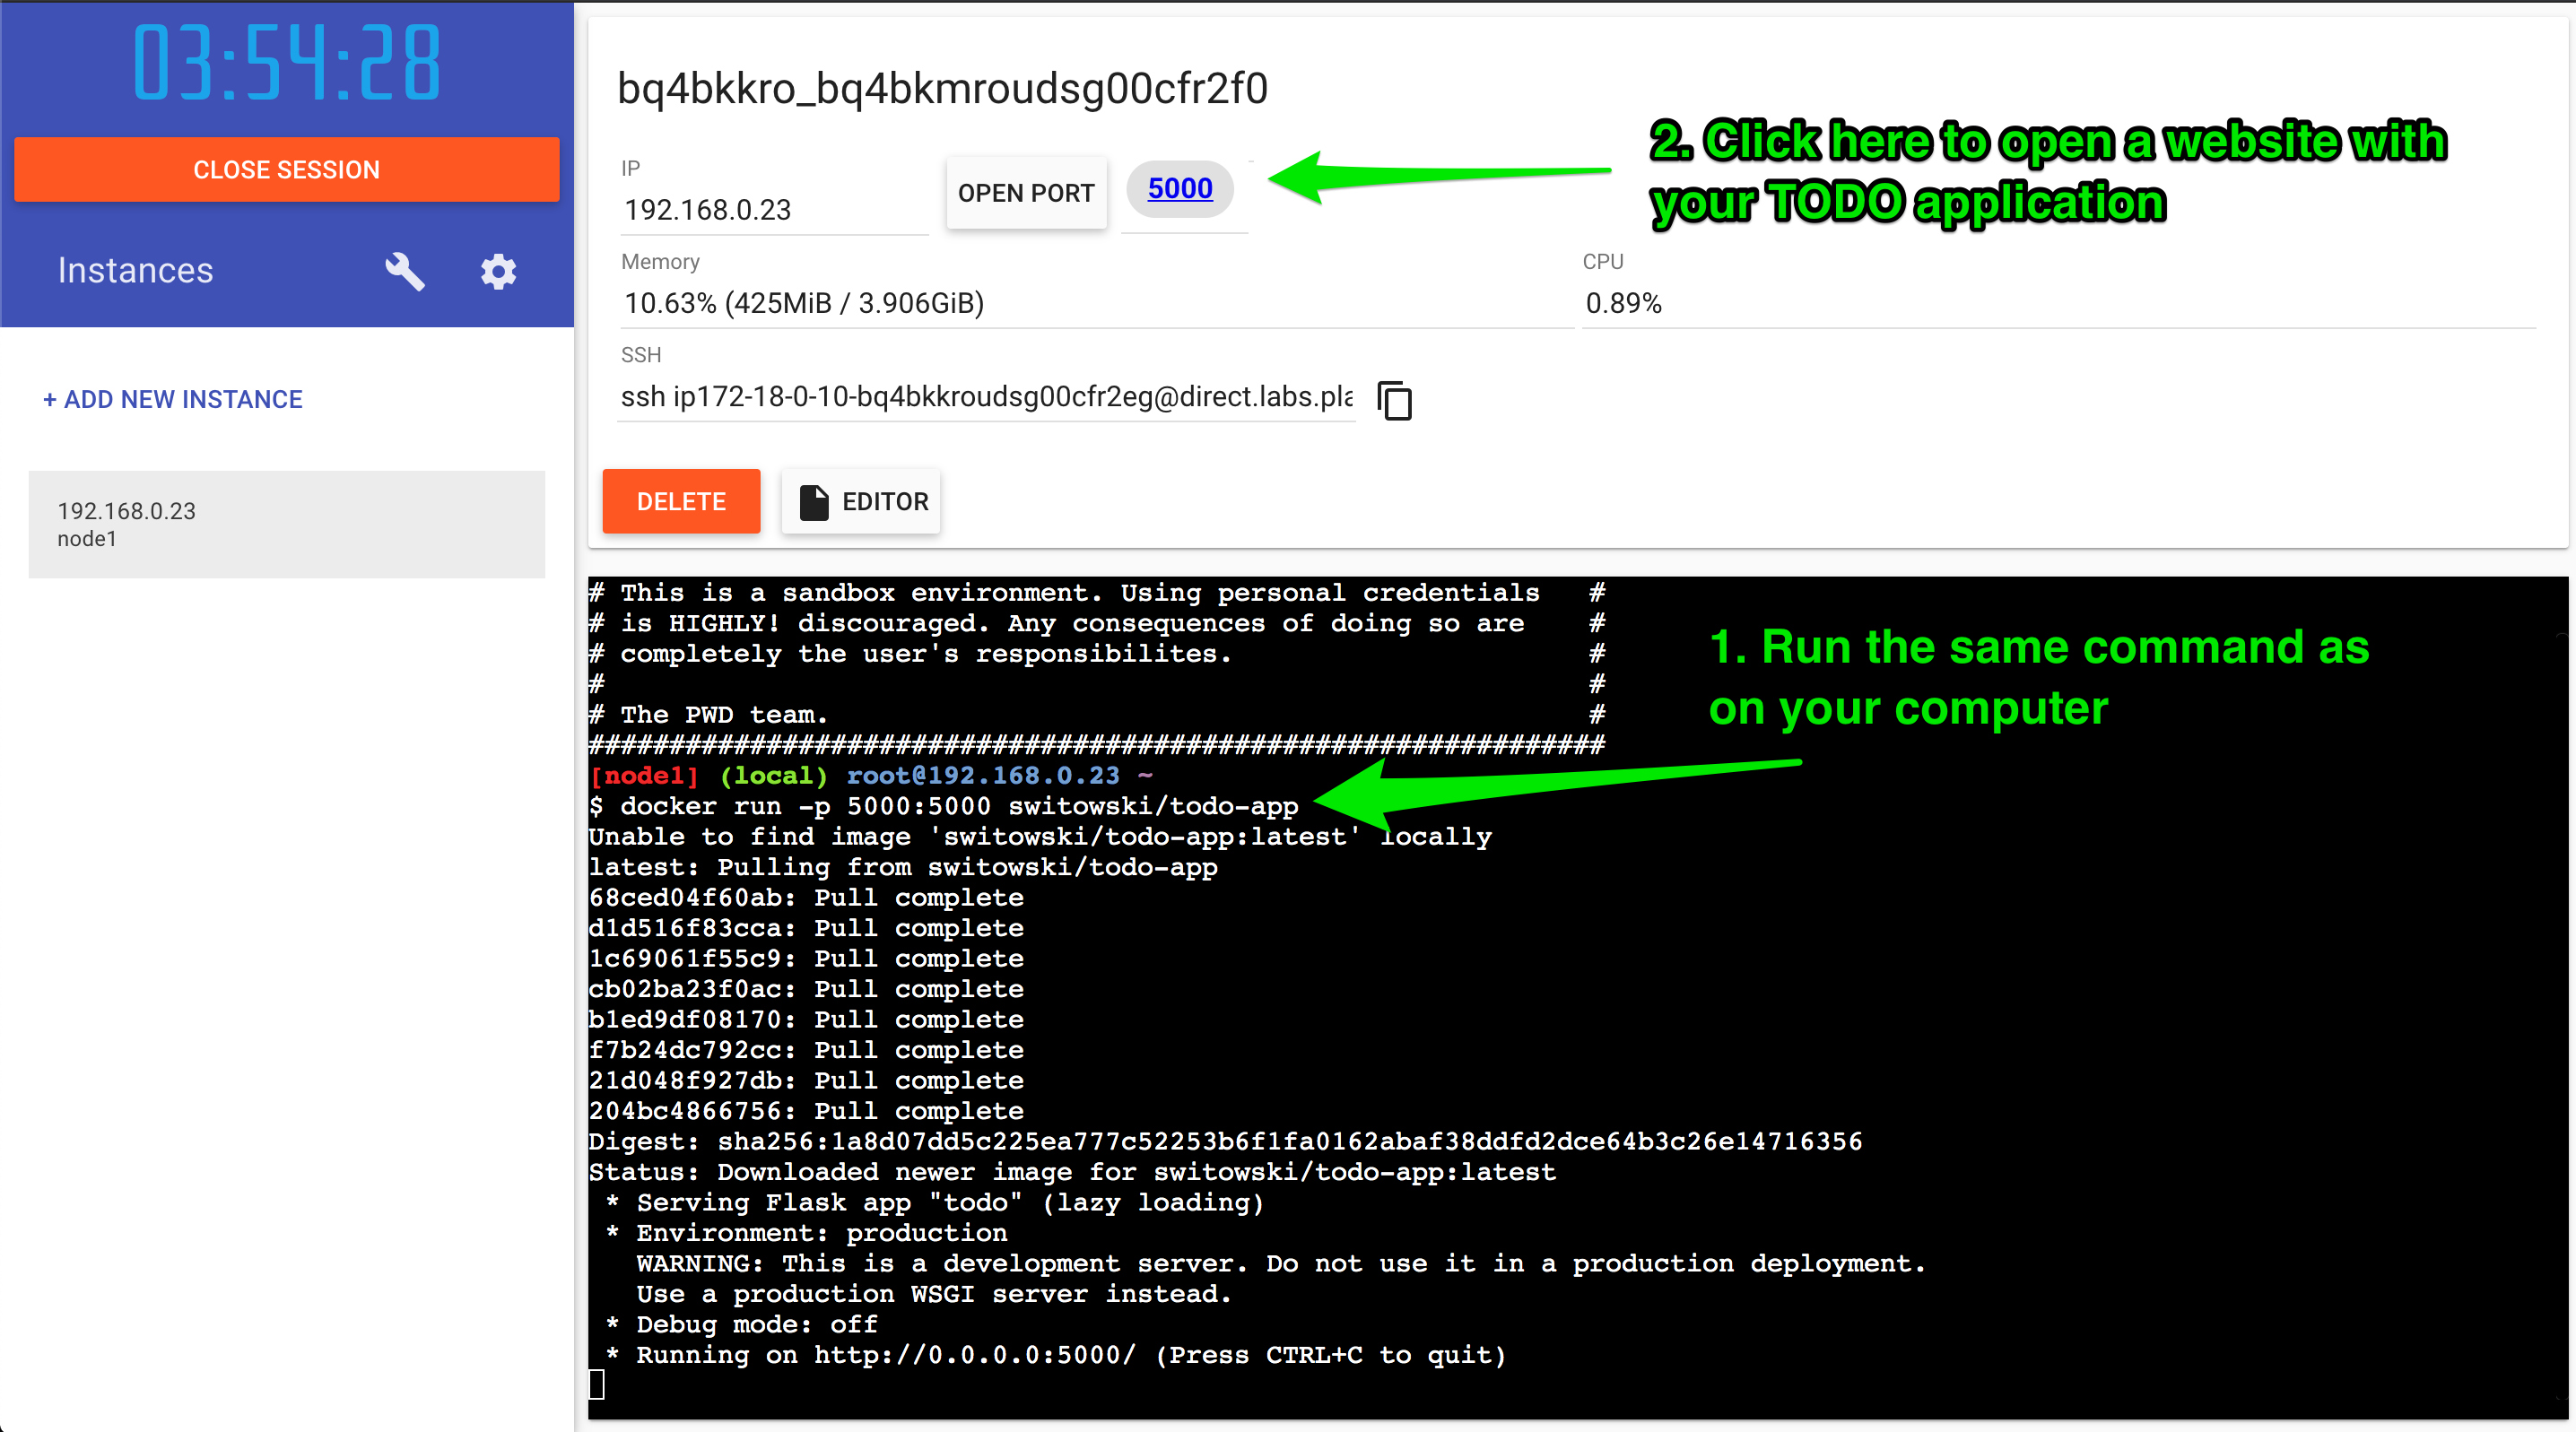
Congratulations, your TODO app is up and running (for the next 4 hours) and you can send a link to someone.
For production-grade deployments, you can use AWS, Heroku, or one of the Kubernetes providers. But that’s a story for another workshop ;)
Things to keep in mind with Docker
Image sizes
If you are working on Ubuntu, you might think that using ubuntu:18.04 (or any other) image as the base image is fine. Well, you probably don’t need the whole Ubuntu installation, and the full Ubuntu image will take a lot of space (hundreds of MBs). Each time you rebuild your docker image, it will take another few hundred MBs of disk space. You will need to prune old images often to reclaim some free space on your computer. But also, sending large images to docker repositories and downloading them on production servers will take much more time.
On the other hand, you can see some folks using alpine images. Those are the advertized as small and secure Linux images. And they really are small - usually taking only a couple of MBs. They don’t have tools that we take for granted, so often, instead of just doing apt-get install`, you will have to compile dependencies of your packages. This is both time-consuming and error-prone. Version pinning is also painful as Alpine removes old versions of packages from its repositories. In the end, if you know what you are doing, you can get away with them (and benefit from their security). But if you find that your build chain gets longer and more complicated because of all the dependencies that you now need to add, there is a better way.
A good middle ground is to use the slim images. Slim image is created by taking the full Ubuntu or Debian version and removing most of the packages that are not useful for the majority of users. This results in images that are a few times smaller in size. For example, debian-buster has around 114 MBs, and debian-buster-slim has 69 MBs.
Multi-stage builds
Another way to reduce the size of your final image is to use multi-stage builds. The idea is that you install all the tools required to build your package in one image, you create a binary package, and then you copy just this binary to a new image and run your application there.
Here is a pseudo-docker code for this:
FROM golang:1.14.1-buster
# Install build tools and additional dependencies
(removed for brevity)
# Compile the binary
RUN go build -o /bin/project

# "scratch" is a completely empty Docker image
FROM scratch
COPY --from=build /bin/project /bin/project
CMD ["/bin/project"]
This will result in a minimal image (containing only the /bin/project binary package).
You can find more information about the multi-stage builds here: https://docs.docker.com/develop/develop-images/dockerfile_best-practices/#use-multi-stage-builds.
The multi-stage builds make sense for C or go packages. But they don’t really make sense in the Python world. Python doesn’t create self container binaries that you can run without any dependencies. The only use-case that I can think of is when your build process requires compilation of some C or Go packages that you later use as binaries. You don’t need the C/Go compilers and dependencies in the final package, so if your final image is huge, consider the multi-stage build.
Separate user for the app
By default, Docker will use a root user inside the container. This means that if someone gets access to your application and can execute some arbitrary code, those commands will be executed as root (keep in mind that the attacker can’t get outside of the container, but it’s still dangerous). It’s much safer to create a separate user for your application.
Monolithic docker containers
Docker makes it easier to create microservices, but nothing stops you from putting SQL server, Redis, and full-text search engine into the same container as your web application. This will make scaling your application much harder in the future. Split each of those applications into a separate container and learn how to use docker-compose to manage them. The good news is - you don’t have to write Docker images for PostgreSQL, Redis, or Elasticsearch. You can use the existing ones and configure them with the docker-compose.yml file.
Docker Swarm
It’s not recommended to use docker-compose on your production (e.g. because it doesn’t support rolling updates). For production, Docker team has created Docker Swarm - it is supposed to be a “lightweight” alternative for Kubernetes. And it really is quite easy to get started with. The only problem is - since Mirantis bought Docker, they promised to support Docker Swarm for some time, but in the long run, they want to focus on kubernetes. It’s hard to say what will happen with Docker Swarm in the future, but it might go away. Keep that in mind if you are planning to start a new project and use Docker Swarm in production.
Learn more
If you want to learn how to improve your Dockerfiles further, check out Dockerfile best practices guide.